
Master Usability Testing: Turn User Insights Into Better Products

 15 MIN
 30 Jan 2026
Usability testing reveals whether real users can actually navigate and complete tasks on your software without frustration. It’s one of the most valuable skills you can develop early in your testing career. This guide walks you through everything from the basic definition to practical methods you can apply in your first project. You’ll learn when to use different testing approaches, which metrics matter most, and how to avoid common beginner mistakes.
Table of content
By the end, you’ll understand not just what usability testing is, but why teams rely on it to build products people genuinely enjoy using. Consider this your friendly introduction to a skill that makes testers invaluable.
What is usability testing and what makes it so valuable
Picture this: you’ve tested an application thoroughly. Every button works, every form submits correctly, and the login flow functions exactly as specified. You’re confident it’s ready. Then real users get their hands on it – and they can’t figure out how to complete the most basic tasks. The software works perfectly, but nobody can use it. This is precisely the gap that usability testing fills.
Website usability testing explained
At its core, it’s a method where you observe real people attempting to complete specific tasks on your product. You watch where they click, listen to their frustrations, and note where they get stuck. The usability testing definition is straightforward: it’s evaluating how easy and efficient a product is to use by testing it with actual users.
Think of it as the difference between asking “does this work?” and asking “can people actually use this?” Functional testing answers the first question. Usability testing answers the second.
In software testing, we often focus heavily on whether features function correctly. Usability testing in software testing adds another dimension – it examines whether those correctly functioning features actually make sense to the humans using them. Software usability testing bridges the gap between technical correctness and real-world usefulness.
Three elements of usability testing
A usability test typically involves three elements: a facilitator who guides the session, a participant who represents your actual users, and a set of realistic tasks for that participant to attempt. The facilitator observes without helping, taking notes on where the participant succeeds, struggles, or fails entirely.
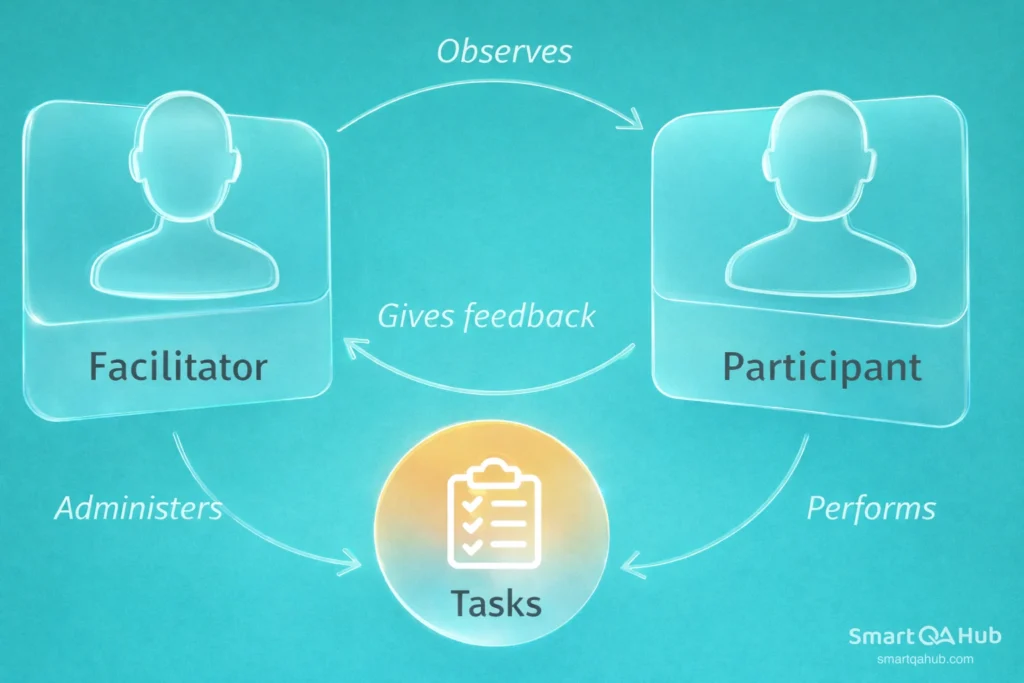
What is a usability test trying to uncover? Problems that seem invisible to the people who built the product. When you’ve worked on something for months, you develop blind spots. You know exactly where every button is and what every icon means. Your users don’t have that advantage. They’re seeing your product with fresh eyes – and usability testing lets you see it through those eyes too.
The usability test definition might sound simple, but its impact runs deep. Teams that skip this step often discover usability problems only after launch, when fixes become expensive and user frustration has already set in.
The real benefits of putting users first
Why conduct usability testing when you could just ship the product and see what happens? Because the benefits of usability testing extend far beyond catching a few interface problems.
- Finding problems before they cost you
Every usability issue discovered before launch is an issue you don’t have to fix under pressure later. Post-launch fixes typically cost significantly more than pre-launch corrections – not just in development time, but in user trust. Usability testing benefits your entire team by surfacing problems when they’re still cheap to address.
- Building genuine empathy for users
There’s something powerful about watching a real person struggle with something you assumed was obvious. It shifts your perspective permanently. Once you’ve seen users misinterpret a button label or miss a crucial feature entirely, you start thinking differently about every user interface you encounter. This empathy makes you a sharper, more thoughtful tester.
- Getting stakeholders to actually listen
Telling a product manager that “users might find this confusing” rarely moves the needle. Showing them a video clip of three different users all making the same mistake? That gets attention. Usability testing provides evidence that’s hard to argue with. Why is usability testing important for your career? Partly because it gives you data that influences decisions.
- Standing out in your field
Testers who understand usability are increasingly valuable. As companies recognize the importance of usability testing, they seek QA professionals who can evaluate both function and experience. Adding this skill to your toolkit early gives you an advantage that compounds over time.
Pro tip: One usability test with just 5 users typically uncovers around 85% of major problems. You don’t need massive studies to generate meaningful insights.
The usability testing goals ultimately serve one purpose: creating products that people can use efficiently and without unnecessary frustration. That goal benefits everyone – users get better experiences, businesses get better outcomes, and you get the satisfaction of contributing to something that actually works for real people.
Types of usability testing you’ll encounter
Not all usability testing looks the same. Understanding the types of usability testing helps you choose the right approach for your situation and resources.
Moderated vs. unmoderated testing
Moderated usability testing means someone guides the session in real time. You’re there (either physically or via video call) to introduce tasks, answer clarifying questions, and probe deeper when something interesting happens. This approach gives you rich, detailed insights because you can ask “what were you expecting when you clicked that?” the moment confusion appears.
The tradeoff? It takes more time and requires scheduling coordination.
Unmoderated usability testing lets participants complete tasks on their own, usually following written instructions. They might record their screen and think aloud while you review the footage later. This scales more easily – you can run multiple sessions simultaneously without being present for each one.
The tradeoff here is depth. You can’t ask follow-up questions in the moment, so you sometimes miss the “why” behind a behavior.
Remote vs. in-person testing
Remote usability testing has become the standard for most teams. Participants use their own devices in their natural environment, which often produces more realistic behavior than a sterile lab setting. Tools handle screen recording, and video calls enable real-time observation when needed.
In-person testing still has its place, particularly when you need to observe physical interactions or when the product involves hardware. But for most software usability testing, remote methods work beautifully and eliminate geographical constraints.
Qualitative vs. quantitative approaches
Qualitative usability testing focuses on understanding behavior and motivation. You’re watching, listening, and interpreting. The output is insights like “users expected the save button to be in the top right corner” or “the terminology confused everyone.”
Quantitative usability testing focuses on measurement. How long did the task take? What percentage of users completed it successfully? How many errors occurred? The output is numbers you can track over time and compare across versions.
Most practical usability testing blends both approaches. You measure task completion while also noting why certain users failed.
| Type | Best for | Typical setup | Effort level |
|---|---|---|---|
| Moderated | Deep insights, complex flows | Video call + screen share | Higher |
| Unmoderated | Scale, initial discovery | Testing platform + recordings | Lower |
| Remote | Most situations, distributed teams | Video tools, own devices | Medium |
| In-person | Hardware, sensitive products | Lab or office, dedicated equipment | Higher |
| Qualitative | Understanding the “why” | Observation + interviews | Medium |
| Quantitative | Benchmarking, comparisons | Metrics tracking, larger samples | Higher |
Usability testing methods that actually work
Beyond the broad categories, several specific usability testing methods give you practical tools to apply. These methods of usability testing have proven effective across countless products and contexts.
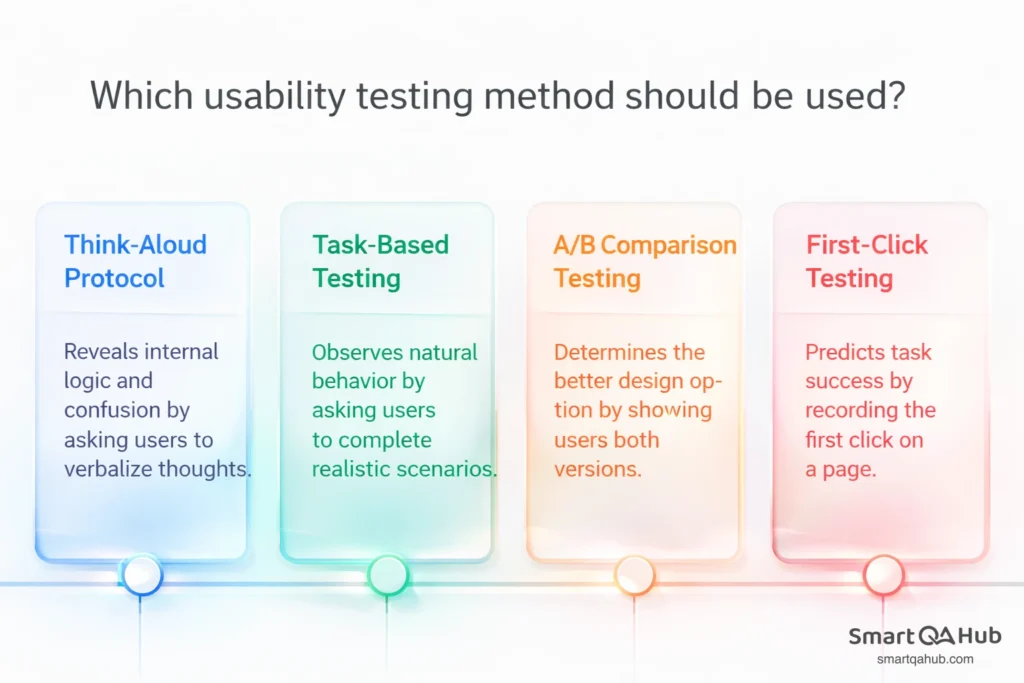
Think-aloud protocol
This is the workhorse of usability testing and an excellent place to start. You simply ask participants to verbalize their thoughts as they work through tasks. “I’m looking for the search bar… I think this icon might be it… no, that opened settings… let me try up here…”
The think-aloud method surfaces the internal logic users apply when navigating your product. It reveals assumptions, expectations, and moments of confusion that silent observation would miss.
Facilitating tip: Resist the urge to help when users struggle. A gentle “keep telling me what you’re thinking” is fine. Explaining how to complete the task defeats the purpose entirely.
Task-based testing
You create realistic scenarios and ask users to complete them without step-by-step instructions. The task should mirror what actual users would try to accomplish.
Good task: “You want to change your account password. Please do that now.”
Poor task: “Click on Settings, then Security, then Change Password, and enter a new password.”
The first lets you observe natural behavior. The second just tests whether users can follow directions.
[EXAMPLE BOX] Sample task scenarios for an e-commerce checkout:
- “You’ve decided to buy the blue jacket you found earlier. Complete your purchase.”
- “You changed your mind about the delivery address. Update it to your work address.”
- “You want to apply a discount code you received by email. Add it to your order.”
A/B comparison testing
When your team has two design options and can’t agree which works better, let users decide. Show participants both versions and observe which one they navigate more successfully.
Keep variables controlled – test one difference at a time when possible. If version A has different colors, layout, and terminology, you won’t know which factor influenced the results.
First-click testing
Where users click first often predicts whether they’ll complete a task successfully. First-click testing focuses specifically on that initial action. You show users a page and a task, then record where they click.
This method works brilliantly for testing navigation structures and homepage layouts. It’s quick to run and analyse, making it ideal for early-stage design validation.
When to do usability testing (and when to skip it)
Timing matters. Understanding when to do usability testing can help you maximize impact without wasting resources.
- During early prototypes: This is arguably the most valuable time to test. Problems discovered in a wireframe cost almost nothing to fix. The same problems discovered after full development cost significantly more. Even paper prototypes or basic clickable mockups can reveal major navigation issues.
- Before significant launches: Whether it’s a new product or a major update, testing before release catches issues while there’s still time to address them. This validation testing builds confidence that users will actually be able to accomplish their goals.
- After changes or updates: New features can inadvertently affect existing workflows. A quick usability check after updates ensures you haven’t broken something that previously worked well. Think of it as regression testing, but for the user experience.
- Continuously, in smaller doses: Rather than one massive annual study, many teams now integrate lightweight usability testing into regular development cycles. Testing a few users each sprint keeps insights flowing without requiring huge dedicated efforts.
- When you might skip usability testing: Not every change needs usability testing. Minor copy updates, straightforward bug fixes, or changes with no user-facing impact don’t require user observation. Use judgment – if you’re confident users won’t notice the change or if the change directly addresses a known usability problem, testing might be redundant.
Have you identified which stage your current project is in? That often determines which testing approach makes the most sense.
Goals and metrics that matter
Walking into a usability test without clear objectives is like testing software without acceptance criteria. You need to know what success looks like before you start.
Setting clear testing goals
The goals of usability testing should connect to real questions your team needs answered. Vague goals produce vague results.
Weak goal: “See if users like the new design.”
Strong goal: “Determine whether users can complete the checkout process without assistance within 3 minutes.”
Strong goals specify what you’re measuring, who you’re measuring it with, and what threshold indicates success or failure. They give your usability testing focus and make analysis straightforward.
Key metrics to track
Usability testing metrics translate observations into data you can act on and track over time.
- Task success rate measures whether users completed their assigned task. Did they actually manage to change their password, find the product, or submit the form? This binary metric – success or failure – provides your most fundamental usability indicator.
- Time on task captures efficiency. Two users might both succeed, but if one took 30 seconds and another took 5 minutes, the experience quality differs dramatically. Track average time and look for outliers.
- Error rate counts mistakes along the way. Wrong clicks, backtracking, failed attempts before success – these all indicate friction in the experience. Some errors are minor; others cause users to give up entirely.
- User satisfaction adds the subjective dimension. The System Usability Scale (SUS) is a standard 10-question survey that produces a comparable score. Net Promoter Score (NPS) measures likelihood to recommend. These scores capture how users feel about the experience, not just how they performed.
| Metric | What it measures | How to calculate | What “good” looks like |
|---|---|---|---|
| Task success rate | Completion | Completed ÷ Attempted × 100 | Above 78% for typical tasks |
| Time on task | Efficiency | Average seconds/minutes per task | Depends on task complexity |
| Error rate | Friction | Total errors ÷ Total attempts | Lower is better; 0 is ideal |
| SUS score | Perceived usability | Standardized survey calculation | Above 68 is above average |
Your first usability test: A step-by-step walkthrough
Ready to run your own usability test? These usability testing steps will guide you through a basic session you can execute even with minimal resources.
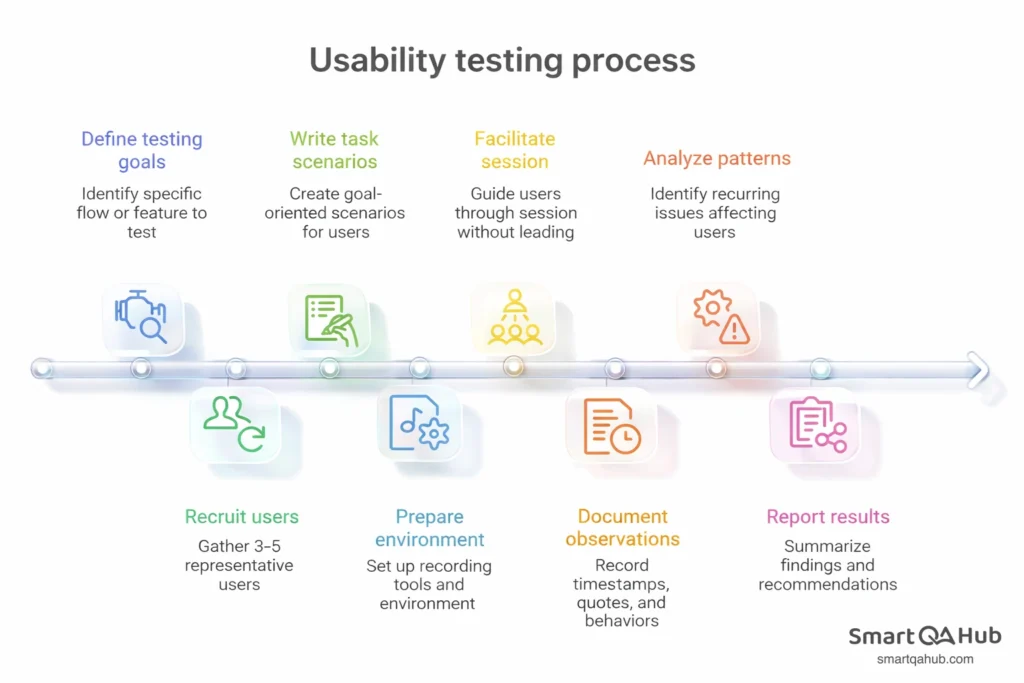
- Define what you’re testing and why. Pick a specific flow or feature. Write down the questions you want answered. “Can new users successfully create an account?” is focused and testable. “Is the app good?” is not.
- Recruit 3-5 representative users. You don’t need dozens of participants. Research consistently shows that 5 users uncover most usability problems. Find people who match your actual user base – if you’re testing an app for accountants, test with accountants.
- Write task scenarios, not instructions. Give participants a goal and let them figure out the path. “You want to invite a colleague to your project” tells them what to accomplish without revealing how to accomplish it.
- Prepare your environment and recording. Decide how you’ll capture what happens. Screen recording is essential. Video of the participant’s face adds valuable context for interpreting their reactions. Test your setup before the real session.
- Facilitate without leading. Introduce the session, explain the think-aloud method, and then step back. When users struggle, resist the urge to help. You’re there to observe, not to teach.
- Document observations systematically. Note timestamps, quotes, and specific user behaviors. “User looked confused” is vague. “User clicked settings icon, paused 8 seconds, then clicked back button” is actionable.
- Analyse patterns and prioritize findings. Look for issues that affected multiple users. A problem one person encountered might be a fluke. A problem four out of five people encountered is a pattern that demands attention.
- Report results that drive action. Summarize findings with video clips and clear recommendations. Connect each finding to its impact on users and the business. Make it easy for stakeholders to understand what needs to change.
[CHECKLIST BOX] Pre-test preparation checklist:
- Testing goals documented
- Task scenarios written and reviewed
- Participants recruited and scheduled
- Recording software tested
- Quiet space secured
- Note-taking template ready
- Backup plan if technology fails
Usability testing terminology explained
Facilitator/moderator: The person guiding the usability test session. They introduce tasks, observe behavior, and ask follow-up questions.
Task scenario: A realistic goal given to participants without step-by-step instructions on how to achieve it.
Think-aloud protocol: A technique where participants verbalize their thoughts while completing tasks, revealing their decision-making process.
Usability vs. user experience: Usability focuses specifically on how easy and efficient a product is to use. User experience (UX) is broader, encompassing emotions, perceptions, and overall satisfaction with a product.
User testing tools and resources to explore
Free and low-cost options for getting started:
- Loom or OBS Studio for screen recording
- Zoom or Google Meet for remote sessions
- Google Forms for post-test surveys
- Notion or simple spreadsheets for organizing findings
Where to learn more:
- Nielsen Norman Group (nngroup.com) – foundational usability research and guidance
- Usability.gov – government resource with practical guides
- ISTQB usability testing materials – connects to broader QA certification
FAQ: Frequently asked questions about usability testing
How many users do I really need?
For qualitative insights, 5 users typically reveal around 85% of usability problems. For quantitative data where you need statistical significance, you’ll need larger numbers – often 20 or more. Start with 5 and increase if your user research questions demand measurable comparisons.
What if I can’t find real users?
Start with anyone who wasn’t involved in building the product. Colleagues from other departments work for initial testing. Friends and family can spot obvious issues. Professional recruitment services exist for when you need specific demographics. Something is always better than nothing.
Do I need special equipment?
Not to start. A computer with screen recording software and a video conferencing tool handles most remote testing. Your phone can record in-person sessions in a pinch. Dedicated usability labs with eye-tracking and one-way mirrors exist, but they’re not necessary for valuable testing.
How long should a usability test session take?
Plan for 30-60 minutes per participant. Much shorter and you can’t cover enough ground. Much longer and participants get fatigued, which affects their behavior and user feedback quality.
Your usability testing journey begins
Usability testing transforms how you think about quality. It shifts focus from “does it work?” to “can people actually use it?” – a question that determines whether your software succeeds or frustrates the people it was built to serve. For junior testers, mastering usability testing early creates lasting career advantages. You’ll catch problems others miss, communicate findings that influence decisions, and develop empathy that makes you better at every type of testing you’ll encounter.
Start small. Even watching one user struggle with a task you thought was obvious teaches you something valuable. That single observation might prevent hundreds of future support tickets or abandoned sessions. Your next step? Pick one feature of a product you’re working on. Write a simple task scenario. Find one person who hasn’t used it before. Watch what happens. That’s usability testing – and it starts that easily.


